


Anatomy, Articles, Shoulder, Yoga Medicine® News
Shoulder Mobility through Scapular Stability
Jenni Tarma shares how, despite misconceptions, shoulder mobility can be improved by working on joint stability. She demonstrates several excercises to help the region with both mobility and stability.
Shoulder Mobility through Scapular Stability
We tend to think of mobility and stability as opposing ends of the spectrum: increased strength comes at the cost of flexibility, and vice versa. Similarly, we typically associate strong muscles with tightness, as per the stereotypical, muscle-bound athlete who can’t touch her toes. While there can be a correlation between strength and tightness (and athletes do need tension in their muscles in order to perform well), simply equating strength with tightness leads to a limiting and over-simplified understanding of a relationship that is inevitably more nuanced in real life.
Rather than forcing the relationship between stability and mobility into binary parameters, it’s more useful to think of them as two sides of the same coin. Much like the forces of yin and yang, they do oppose each other, but they are also interdependent and more significantly, feed into each other. To put it simply, we need stability to create the conditions necessary for mobility. Let’s explore this relationship in the context of some real-life movement, and see how creating stability and strength in the scapulae can actually pave the way for freer, easier movement in the chest and shoulders.
Stability creates mobility
Stability as the foundation of mobility is a well-established concept in the field of physical therapy, and can easily be applied to yoga asana. In order to understand how this works, let’s backtrack to consider what “good mobility” actually means. Having pliable tissues that allow for a wide range of motion is an obvious prerequisite so our movements aren’t hindered by the mechanical limitations of a muscle that cannot lengthen.
However, it’s not actually our muscles that govern how and how far we move; rather they are operating at the command of the nervous system. The nervous system’s primary concern is safety, and as the regulator of mobility, it grants a range of motion based on whether a particular movement is perceived as being safe. Safety, in this instance, requires an active integration of the joint (stability!) as well as limiting the movement to a range that we can control. Most of us know that simply flinging our bodies passively into deep stretches contributes little in the way of functional, usable range of motion.
In fact, extreme passive stretching can even have a counterproductive effect as muscles (at the command of the nervous system, of course) grip in response to the perceived threat of an overly intense stretch in a range of motion that it can’t control.
Joint Control
The notion of control is pivotal, since it determines whether the nervous system accepts or rejects movement, depending on muscles’ ability to engage in, and therefore control, that particular range of motion (ROM). With this in mind, we can further highlight the interdependent, interconnected nature of stability and mobility. In effect, stability and mobility are two words that we use to describe different aspects of the same thing. Stability is ROM with control and is therefore perceived as safe by the nervous system. Conversely, mobility is ROM without control, and is perceived as unsafe. It stands to reason that by engaging mindfully within a ROM where muscles can operate with strength, we stand to gain mobility by satisfying the nervous system’s need for safety and controllable ROM.
Investigating ROM through active engagement in asana
Let’s explore this relationship through real-life asana scenarios, more specifically in the shoulders, upper back and chest. Some prerequisites for successfully opening the chest include engaging the upper back muscles and integrating the shoulder joint. These actions are also interrelated: squeezing the shoulder blades together broadens the chest, but also creates the foundation of stability needed for the glenohumeral joint to stabilize; think of the humerus moving downwards as the shoulder joint “packs itself” into its socket. Let’s follow a gradual path through these actions, in increasingly more challenging poses.
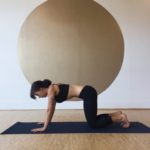
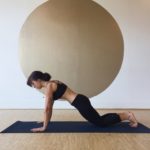
1. Basic scapular stability
In tabletop position, scoop your low belly in to find a flat back. Soften the elbows with a small bend so they’re not locked, but commit to keeping your arms straight and your spine long. Actively squeeze your shoulder blades in towards each other and feel your chest lower towards the floor. The Rhomboids, located between the scapulae, will turn on as you do so (see Tabletop 1).
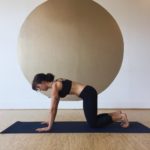
Then do the opposite: move the shoulder blades apart; notice the area around the side ribs (Serratus Anterior) engage to create the action, and emphasize it further by pressing the floor away with your hands (see Tabletop 2).
Go through several more rounds of the movement, inhaling to squeeze the shoulder blades and exhaling to widen them. Periodically checking in to make sure you haven’t strayed into a cat-cow movement as the arms should still be straight and the movement limited to the scapulae, rather than the spine.
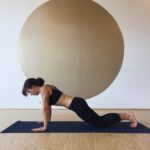
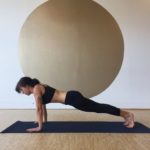
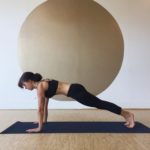
To make this more challenging, you can repeat the scapular stability movements in a modified plank pose with the knees down (more challenging) and full plank (even more challenging).
2. Shoulder joint integration
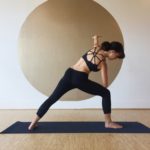
Next, let’s add the “packing in” action of the shoulder joint. Start in Side Angle Pose, right leg forward, right forearm resting on the thigh. Move your left arm up to the ceiling, and then slightly behind you, if it’s available. Notice that while your arm is able to go further back in space, doing so causes the humerus to slide forward in its socket and destabilize the shoulder joint as you enter into passive ROM. This is what NOT to do.
Instead, start by building the foundation of shoulder stability in the left scapula. Reach your left arm horizontally out to the left and allow the shoulder blade to go with it as it moves away from the spine and towards the side ribs (see – Side Angle 1).
Keep your arm reaching forward and then draw the shoulder blade back to the spine. Repeat this motion a several times to familiarize yourself with the movement and the engagement of the Rhomboids and the Serratus; think about ‘gliding” the scapula on the back of the rib cage (see below – Side Angle 2).
Now, add the shoulder: firmly retract the scapula towards the spine, stack the left arm on top, but without losing the engagement around the shoulder blade and letting your arm passively flop behind you (see below – Side Angle 3).
Finally, hollow out the armpit by hugging the humerus down and back into its socket with a slight external rotation of the joint- the resulting sensation should be one of firm integration and support. Repeat on the second side.
3. Accessing chest-opening
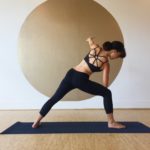
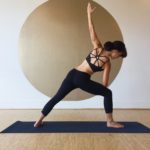
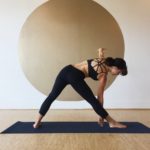
Let’s further refine these action by adding the rotational element of the torso. Begin in Triangle pose with the right leg forward. Wrap your left arm across your chest and to the right side ribs, allowing the chest to roll down and the upper back to slightly round as part of the movement (see Triangle 1). Then, roll the chest open, using the left hand to guide the right side ribs down (see Triangle 2).
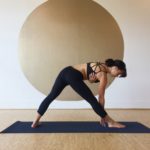
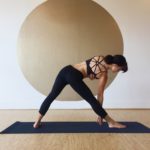
Repeat the action, adding in the movement of the scapula. The chest rolls down as the scapula protracts and arm reaches forward and then rolls up as the scapula retracts (see Triangle 3-4). End with retracting the scapula, hollowing out the armpit, and stacking the arm on top (see Triangle 5).
The important thing is that the left shoulder blade moves ahead of the humerus, and therefore always precedes the stacking of the arm. Even if the arm should eventually move further back behind you, that movement is still prefaced by the retraction of the shoulder blade, so as not to lose the necessary foundation of stability. Once the mechanics are familiar, focus on the overall feel of the action.
The movement of the shoulder blade in particular should have a fluid, sliding quality, rather than wrenching or muscling your way through the action. Remember, we’re trying to combine stability and mobility in appropriate ratios to create a movement that is both supported and controlled. This is, effectively, an exercise in balancing sthira and sukha: having enough effort to create support and safety while still maintaining a sense of ease.
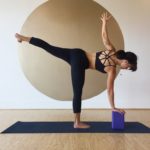
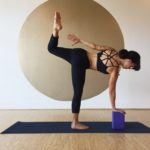
If you’d like to challenge yourself by adding a balancing element, repeat all of this in Half Moon (see below).


4. Putting it all together
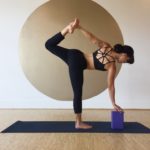
Next, we’ll combine these actions in Chapasana. This presents the opportunity to use scapular retraction to access deeper (but still supported) opening of the chest, whilst keeping the humeral integration. Start in Half Moon pose with the right leg as the standing leg. A block under the under the right hand can be helpful here so you don’t have to use too much brain power on balancing. Find the familiar actions in the left shoulder: scapula retracted, armpit hollowed out, humerus down in its socket. Reach your left arm towards your left foot and rotate the thumb down; bend the left knee and grab hold of the foot (see Chapasana 1). Finally, draw both shoulder blades strongly in towards each other as you move your sternum forward and your left shin back (see Chapasana 2). Stay and hold before repeating on the second side.
Conclusion
It’s worth noting that these movements, executed mindfully and with control, are beneficial in and of themselves. Trying the actions in more difficult poses adds variety and challenge. But, that isn’t necessary in order for them to be effective. For purely therapeutic purposes, you could choose to stay with the simpler poses and focus on observing which portions of the movement feel easy vs difficult. Or, if there are significant differences between left and right. Many people have some degree of weakness in their scapular stabilizers, and can gain much in terms of shoulder strength, posture, rotator cuff stability, and general functionality from doing even the simplest of the exercises outlined here. “Achieving” the more difficult versions shouldn’t necessarily be seen as an end goal.
Pingback: 肩甲骨 柔らかい人の特徴とは?メリット・チェック法・改善ストレッチ完全ガイド - 新居浜市で腰痛、肩こり、頭痛を改善できる整体・骨盤矯正なら西の土居整骨院へ
Pingback: Three Moves to Increase Muscle Mobility - Four Fitness Website - FrankRolls