


Articles, Dana Diament, In the Press, Uncategorized, Yoga Medicine® News
7 Myths About Yoga Alignment
By Dana Diament for Yoga Journal.
If you jump around between yoga teachers or lineages, confusion about asana alignment is understandable. Here, Yoga Medicine teacher Dana Diament debunks some common myths with wise anatomy.
One of my favorite things about yoga is the variety of yoga methods and lineages to choose from. But with all of those choices, you may be left feeling confused about alignment. The proliferation of yoga asana images in recent years only makes matters trickier as more and more students strive to recreate the poses exactly as they see them. Many teachers are also taught to instruct poses to textbook standards, which were not necessarily created for Western or female bodies. This dogmatic approach to alignment sets the scene for certain myths to take hold in our yoga communities about the “right” way to do a pose. To shed light on a few of these myths, let’s take a closer look at some of the key anatomical concepts behind some common yoga poses.
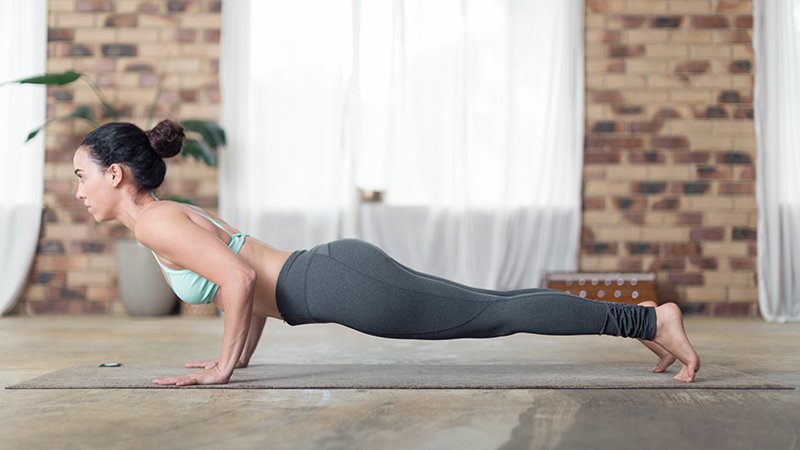
Myth 1: In Chaturanga, the elbows should be bent to a 90-degree angle.
Many yoga practitioners are fixated on achieving that 90-degree bend at the elbow in Chaturanga. The problem with this common cue is that when your shoulders are at or below elbow height, you’ve lost a lot of your strength in the stabilizing layers of the shoulder joint. Here, the tendency is to lay into the shoulder joint and round the shoulders. This position usually results in loss of support from the core and legs as well as the efficiency of the triceps. It also increases pressure on the biceps tendon, the rotator cuff muscles, and the deeper structures of the joint like the labrum and joint capsule.
Instead, the key is to bend your elbows only to the point where you can maintain strength in your arms, shoulders, legs, and core. This can very well mean that the angle in your elbows will be greater than 90 degrees. Test it out by doing a strength test in your Chaturanga: After you bend your elbows, you should feel strong and supported. If you fail the test, don’t despair. Simply drop your knees and lower down only to the point where you can maintain your strength.
See also A Yogi’s Guide to the Shoulder Girdle + Its Actions
Myth 2: In Chaturanga, the chest should point toward the ground.
Opening up the chest is a key component for the whole shoulder to work together in Chaturanga. It’s important to learn how to fire the muscles in symphony, rather than overusing any one muscle or part of the shoulder at a time. Because most people tend to be stronger in the pec muscles than the back of the shoulder, we often round the shoulders forward. However, we want to keep the head of the humerus centered in the joint by balancing the strength in the front and back of the shoulder.
Turning the sternum forward to open the chest assists in engaging the muscles of the posterior shoulder. The rhomboids together with serratus anterior form a strap effect to stabilize the shoulder blade, which also assists the muscles that keep the arm bone centered in the shoulder socket. The key to this is to stretch the chest open before bending your elbows and keep your core engaged. The core is critical here to prevent dropping the pelvis and sagging in the low back. With your core engaged, as you open the chest the spine will curve a little bit, which prepares you to head into Upward-Facing Dog as you’ve already begun to initiate a backbend.
Myth 3: In preparation for Wheel Pose, you should pause on the top of your head and hug your elbows in toward the center.
Pausing at the top of your head as you come into Urdhva Dhanurasana is a great idea to help you set up the chest in order to create a fuller curve to your backbend. You might, however, find it more helpful to move your elbows away from the midline rather than hugging them in. To understand this, it’s helpful to look at the natural mobility of the spine. When we come into Wheel Pose, most of the bend happens in the lower back, or lumbar spine, while the amount we can bend in the upper back, or thoracic spine, is limited.
Due to the orientation of the facet joints of the vertebrae and the attachment of the ribs onto the thoracic spine, this part of the spine naturally has less mobility. This is a good thing as our ribs house important vital organs like our heart and lungs. However, because of this limited mobility in our thoracic spine, it is actually the opening of the chest that gives a more “C”-curved shape to our backbend.
In order to open the chest, what we need to do is move the shoulder blades out of the way by retracting them (pulling them in toward each other). Taking the elbows further apart makes that action more accessible, especially if there is limited flexibility around the shoulder. Once you’re able to draw the shoulder blades together, you can bring your elbows toward each other as you begin to straighten your arms to lift your head off the ground.
See also Tiffany Cruikshank’s Yoga Tricks for Better Digestion
Myth 4: In Tree Pose, your lifted knee should point directly to the side.
In Tree Pose, the common tendency is to turn the knee to the side and for brevity’s sake that might be a simpler way to cue the pose. However, the anatomical reality is that because the acetabulum (the part of the pelvis that the femur bone inserts into) faces slightly forward, it’s impossible even with greatest hip flexibility to turn your knee to the side without moving your pelvis, which also rotates the spine. Instead in Tree Pose, try keeping the pelvis squared forward and moving the knee as far to the side as you can without letting the pelvis change. That will keep the spine, the hip, and the standing leg squared forward too.
Myth 5: In Warrior I, your feet should be in “heel-to-heel” alignment.
Setting up Warrior I with the feet wider apart than heel-to-heel alignment can be much more favorable for the health and comfort of your hips and spine. Warrior I is a forward-facing posture and having the heels on one line, as if standing on a tight rope, makes turning the hips forward quite challenging. By having distance between the legs, you create space in your hip sockets to help you find the rotation in the pelvis for this posture without twisting the spine, over-arching the lower back, or causing unwanted compression in the SI Joint (sacroilliac joint).
How far to step your feet apart depends on the proportions of your pelvis. Positioning your feet as wide as the outermost bony prominence on your thighbone (the greater trochanter) creates a sturdy base for this pose. To keep it simple, a good rule of thumb is to separate your feet about 3–4 feet apart.
Myth 6: In Revolved Crescent Lunge, your triceps or armpit should touch the outer part of the front knee.
This alignment in your Revolved Crescent Lunge will take you into a very deep twist. If your hips and spine are not flexible enough for this deep version of the pose, you’ll need to use your arms to get into it, which commonly causes the spine to round. This rotation and added flexion of the spine increases the pressure on the intervertebral discs. One of the benefits of twisting is to hydrate the discs to keep them healthy. You don’t need this deep of a twist to do that.
More is not necessarily better. If your aim is to hydrate the discs and strengthen the stabilizing muscles of the spine, choose to keep the length in the spine and not twist as deeply. To do this, try bringing only your elbow to your knee and keeping your hands in prayer position. If you can’t do that variation keeping your spine straight, you can modify further by either dropping your back knee or placing your bottom hand on the ground directly under the shoulder. You may also reconsider other standing twisting poses, such as Revolved Chair Pose or Revolved Triangle if your primary aim is the healthy movement of the spinal discs.
Myth 7: In Triangle Pose, your bottom hand should grab the big toe of your front foot.
Triangle is one of the poses where almost every school of yoga has something different to offer in regards to alignment, such as this classical Ashtanga variation. However, if you don’t have the flexibility to grab your big toe while keeping both sides of your spine parallel to the floor, you might want to reassess your approach to this pose to maximize the benefits to your spine. One of these benefits is that Triangle pose can increase the side-to-side flexibility of the torso and strengthen certain muscles that are crucial to stabilizing the spine.
To achieve this, the key is stay anchored in your back leg as you reach your front arm forward to elongate the spine out of the pelvis. When you can’t reach your arm forward anymore, simply rest your hand wherever it comfortably lands on your leg. Pay attention here to your tendency to reach the hand further down your leg.
See also Tiffany Cruikshank’s Meditation for Healthy Weight Loss