


Anatomy, Athletes, Yoga Medicine® News
Upper Hamstring Tendinopathy Treatment
for Yoga Medicine® discusses what upper hamstring tendinopathy is, what causes it, and how to treat it with a few simple stretches.
A Short Guide For Yoga Teachers
Upper hamstring tendinopathy is among the most common injuries in the yoga community. Whether it’s a yogi who overshot hanumanasana in a public group class or an athletic private client who sprained their hamstring tendon during a sprints workout, it’s fairly safe to bet that as a yoga teacher, a student will approach you with this issue at some point. They’re often in pain and frustrated: the deep, achy sensation under the glute comes and goes with varying intensity. This type of injury is notoriously slow and difficult to heal. And, when severe enough, it can impact even daily activities like walking, standing, and sitting.
While it isn’t within our scope as yoga teacher to diagnose a proximal hamstring tendon sprain or tear, there’s a lot that we can do to help our students with this common issue in a safe manner. Understanding the basic physiology of the healing process will not only enable you to guide your student effectively but also educate your student about the process so that they can participate in it actively and intelligently.
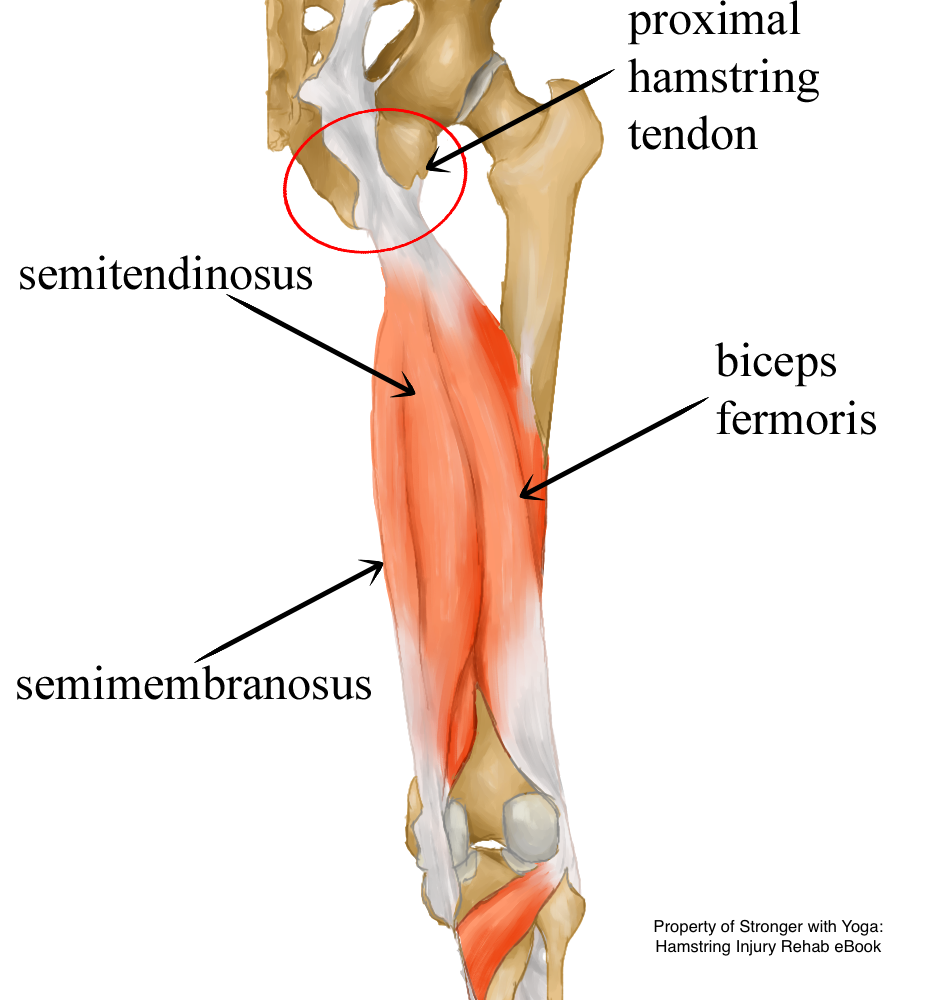
The proximal tendon of the hamstrings. The attachment at the sitting bone, circled here in red, is a common site of injury and irritation.
Proximal Hamstring Tendon Injuries: The Basics
Tendons are made of connective tissue that is composed of two types of fibers: collagen and elastin. Collagen is very tough, while elastin is more elastic. We have many different types of tissue in our bodies, each with a composition designed to fit their particular function. Tendons are not designed to stretch very much, for example. They are therefore mostly composed of collagen with very little elastin.
If the tissue is forced beyond its rather limited capacity to stretch and into a range of motion that it can’t spring back from, it will tear or sprain. As was the case of our Hanuman yogi and sprinter athlete. Damaging the tissue in this manner can be very painful and also reduces the overall tensile strength of the tendon.
The collagen fibers in tendons (and in other tissues) are arranged in a direction that matches the directional load that the tendon is designed to absorb. In a healthy tissue, the fibers are aligned in an orderly manner. This allows them to easily glide past each other. When the tissue is damaged, the body initiates the inflammatory response and a healing process. This process begins to lay down new collagen fibers at the injury site.
Injuries & Scar Tissue
This is where things can start to get messy. From the body’s perspective, an injury is effectively an emergency scenario. The main focus is on crisis control and patching things up quickly. During this period, the orderliness of the fibers is not a priority. The result is collagen fibers that are a cross-linked, multi-directional, bungled mess. That’s what scar tissue is: disorganized, misaligned connective tissue.
The disorganization of the tissue can be problematic for a variety of reasons, but mainly because the cross-linking of the fibers causes scar tissue to adhere to itself and the surrounding tissues. This impedes the repaired tissue’s ability to interface smoothly with the tissues around it, or maybe even to lengthen and stretch in its own limited capacity.
All of this, in turn, limits range of motion, which ironically makes you more likely to reinjure the same area down the line. Without the appropriate intervention, it’s possible to get stuck in a self-fulfilling, chronic cycle of a limited range of motion, tension, injury, inflammation, and fibrosis. With this information in mind, it is clear why it’s crucial to treat a hamstring tendon injury correctly right out of the gate. If we can control and direct the course of the healing process, we can also minimize scar tissue. This will hopefully avoid a lot of hassle, physical pain, and wasted time dealing with reinjury down the line.
The Fine Line Between Healthy Stress and Reinjury
The main goal of any rehab process is to bring the injured tissues’ capacity to handle load back up to a functional level. We want to strengthen them to the point where they can once again withstand the demands of daily activities, yoga practice, and athletic training. We do this by applying stress to the tissue, thereby encouraging it to strengthen in response to that demand.
The word stress tends to have a negative connotation. However, as it pertains to the tissues in our bodies, stress is actually highly productive when applied mindfully and in healthy, manageable doses. The stress of lifting weights is what stimulates muscles to grow stronger to meet similar future demands. The stress of your feet hitting the ground as you run tells your bones and joints to strengthen in response. Our bodies absolutely need stress in order to stay healthy and functional; athletic training of any kind is by definition controlled, systematic application of stress stimulus. In a rehab scenario, we’re using stress in a very moderate, controlled manner to harness and control the strengthening effect it has on our tissues.
With that in mind, how exactly can we nudge the healing process in the right direction and encourage the new collagen fibers to be laid down in an organized, aligned formation? Aside from stimulating the healing process, we also need to stress the tissue in a way that gives it feedback on the direction of the force it needs to handle. This will help determine how the collagen fibers are laid down; ideally, in a neat, tidy orientation rather than the disorganized bungle of scar tissue.
 Strengthening: Next Steps

Conventional wisdom states that the initial injury needs complete rest for at least 72 hours. It may need more depending on the severity). This is to ensure it’s no longer actively painful or inflamed. After that, it’s OK to begin some very cautious strengthening exercises. Slow and gentle is the name of the game. We want to apply the tiniest bit of stress to the tissue. This will encourage the fibers to align themselves in an orderly fashion. We want to avoid applying enough stress to reinjure the area.
That pulling sensation under the glute now becomes a helpful tool that lets you know when you’re pushing too hard. Keep in mind that an injured tissue’s ability to handle stress is very much reduced. So triggering the familiar ache is a sure sign that you should take it down a notch. Overshooting the mark actually just creates fresh irritation and keeps the tissue in a chronic state of low-level inflammation.
Beyond the importance of working at a conservative level of intensity that is productive for the student and their injury, also consider the specific loads that we eventually want the upper hamstring tendon to withstand. Since the hamstrings contract concentrically to bend the knee and extend the hip, and also work eccentrically to flex the hip as the knee straightens, it is important to train the muscles’ abilities to engage in these positions. In practice, this means applying stress to the tendon at an intensity that does not trigger fresh irritation or pain.
Tips
Start with very small movements in a narrow range of motion. Encourage your student to tune in to the sensations. This will help them avoid pushing into or past the familiar achy sensation. Isometric holds are incredibly useful in this situation. These holds can be fine-tuned to an appropriate level that will yield long-term results. They also have the lowest inflammatory response. In some cases, they can even have an analgesic effect that provides instant (albeit temporary) relief. Most experts recommend aiming for 5 sets of up to 45 seconds of muscle contraction1.
This could be too difficult (and therefore not constructive) of a starting point for many students, in which case, even contractions of 5 to 6 seconds can have a beneficial effect2. As always, your job as the teacher is to be an observer, problem-solver, and guide. Always encourage your student to pay attention to the sensations while you interpret their reaction to your cues. Make appropriate modifications to help them work productively in a manner fitting their context, needs, and limitations. Work in a variety of positions and scenarios, increasing the load and range of motion slowly. Progressing cautiously will not only encourage sustainable progress, but the resulting growth in body awareness will serve your students well to protect them from future injury, too.
To Find Out More
To find out more about the physiology of the healing process, specific poses and techniques to safely strengthen an injured tendon, and ways to maintain range of motion during rehab, consider downloading the Stronger With Yoga: Hamstring Injury Rehab e-book. An additional video bundle of short practices suitable for all phases of the rehab process, from post-injury to long-term maintenance and reinjury prevention, is also available via the Stronger With Yoga website.
***
Footnotes and References
- The effects of isometric exercise types on pain and muscle activity in patients with low back pain, Hyun-Seung Rhyu, Hun-Kyung Park, Jung-Sub Park, and Hye-Sang Park
- Therapeutic exercises for the shoulder region, Johnson McEvoy, Kieran O’Sullivan, Carel Bron