


Articles, In the Press, Shoulder, Yoga Medicine® News
The Shoulder Mobility Drill That Changed My Backbend Practice
By Gry Bech-Hanssen for Yoga Medicine®.
Do you have a yoga pose that you really want to master, but that feels completely unrealistic and beyond reach? For me, that pose used to be one legged king pigeon, or eka pada raja kapotasana.
When I first started practicing this pose, I felt like I was miles away. I was confused – my hips and legs had the necessary flexibility needed. I had no problem bending the back leg in pigeon pose. Though I have never been an extreme back bender, I had been a dancer for most of my life. Still, it was just plain impossible for me to reach and hold on to that foot behind my head without feeling like I was about to snap in half. I couldn’t even think about breathing while in the pose!
It wasn’t until I started learning more about shoulder anatomy and function that I realized how my shoulders had uncharacteristically limited range of motion compared to the rest of my body. The last pieces of the puzzle started falling into place.
I had never before made a distinction between backbends with arms overhead like urdva dhanurasana (wheel) and the backbends where the arms are reaching back behind you, such as ustrasana (camel pose), which I actually quite enjoyed. The challenge when the arms are over head lies not as much in the flexibility of the spine, as in the shoulders.
An overhead backbend will challenge your shoulder mobility in a very different way than when your arms are reaching back behind you. Taking a closer look at my own shoulders, I realized that a lot was lacking.
Investigating the Anatomy of Abduction & Flexion
First, I needed my arms to be able to come into full abduction and flexion, in other words, I needed to freely extend my arms overhead. When I reached my arms overhead, my upper arms were nowhere near my ears. For example, in gomukasana my upper elbow would be pointing more to the window than to the ceiling.
To have full range of movement of the shoulder joint, it is crucial that the scapula is able to move with the arm into upward rotation, which means that the shoulder joint is actually to some extent following the arm upward as it moves. If this movement of the scapula is restricted, the shoulder joints are presented with a much greater challenge that often causes a pinching sensation at the top of the shoulders. This is what I felt when reaching my arms overhead.
A muscle that can typically restrict the movement of the shoulder blade in upward rotation is the levator scapula. At first glance, this may not seem so obvious but bear with me. Levator scapula runs from the medial top corner of the scapula to the transverse processes of the vertebrae of the neck. Its primary task is to elevate the shoulder blade into a shrug.
What happens for many of us is that the levator scapula works extra hard to stabilize the head and neck when we hold the head anterior to the shoulders, typically looking at our phones or computer screens. When the levator is chronically tight, it will not let the top of the scapula move down to allow the other side of it, where the arm is attached at the shoulder joint, to follow the arm (into upward rotation). Taking a closer look at my posture, I noticed that my shoulders were rounded forward, and my head held further forward than my shoulders.
Even if your scapulae can upwardly rotate, you might still find it hard to reach your arms overhead. The next part of this equation looks at how freely the arm bone /humerus is able to move relative to the torso and the scapula.
The arm is connected to the upper body and the shoulder blade by a number of muscles. What I previously thought of as my posterior armpit is really a cluster of different muscles crossing each other here, connecting the humerus to the posterior side of the upper body, and the scapula. Latissimus dorsi (that big “wing” covering large parts of the back), its little helper teres major, and the long head of the triceps muscle all pass each other in this area at the back of the arm.
Furthermore, if you have limited movement repertoire or lack of the right kind of movement, it’s likely that the fascia surrounding this braid of muscles and tendons can stick together, making it more challenging to move the arm into full flexion and abduction. Again, if you feel pinching at the top of the shoulder joint in abduction, there is good indication that you could benefit from taking a closer look at this group of muscles.
Another big and strong muscle that has the potential to limit the arm in abduction is the pectoralis major. It connects the arm to the front of the upper body, and is often tight and overworking, especially when the shoulders roll forward.
Freeing up all these areas can have a huge effect on the movement of the arm.
Back to My King Pigeon
To be able to grab that foot behind my head in raja kapotasana, or keep the elbows from splaying out to the sides in urdva dhanurasana. I also needed sufficient external rotation of the arms in full flexion, which I would argue is even more challenging than externally rotating the arms in most other positions, since the lats are being stretched here.
The latissimus dorsi, teres major, pectoralis major, and subscapularis on the underside of the scapula are all internal rotators of the arm, as they connect the front of the upper arm bone to the torso or the scapula. Consequently, most of these muscles are recruited for inward rotation of the arm and forward shoulder carriage.
Releasing this group of muscles not only made it easier to reach my arms over head, it also made a tangible difference in the potential for passive external rotation of the arm. I found it extra helpful to both release the internal rotators and activate the external arm rotators.
The infraspinatus and teres minor muscles at the back of the shoulder actively help to externally rotate the arm bone as it abducts. In addition to turning the arms to reach the foot behind you, this action creates more space in the joint socket for the head of the humerus to move into full abduction without any of that pinching at the top of the joint. If your shoulders slump forward like mine did, these muscles at the back of the shoulder can become both weak and tight.
When a muscle is held in a lengthened position for a long time, the fascial fibers interweaving the muscle tissue can “lock” it in that position. The muscle loses the ability to contract effectively, and with less movement there is a loss of hydration and glide.
To bring it back to a more supple and responsive state, using myofascial release techniques could be greatly beneficial.
As I started working to improve the mobility of my shoulders, my dream pose was literally coming within reach.
Here are Four Ways That I’ve Improved My Shoulder Mobility:
1. Armpit Release

Lie on your side with a foam roller or a block on its middle height under the armpit. One long edge of the block is in contact with the crease of your posterior armpit, the rest of the block is under your side ribs. Rest your head in your hand. If this feels like too much, put a blanket on top of the prop to make it softer. The sensation might be intense, but shouldn’t be intensely painful.
Spend a few moments here to soften against the prop while breathing into your side ribs. Then slowly start to roll back so the block is more directly in contact with the posterior armpit – lats/teres/triceps tendon. Rock back and forth here a few times, staying with points that feel tender while breathing and waiting for an incremental release.
Next, roll even further back, so you feel the block more on the back of the shoulder blade, where your infraspinatus is located. Again, spend some time to breathe and encourage the tissues to release. Stay until the sensation is less intense, or for as long as you are comfortable.
Lastly, roll forward until the edge of the block touches your anterior armpit, where the pectoralis major passes from the arm to the chest. Place both your forearms on the floor in front of you and look towards the ground. You can rest your head on your other arm if that’s accessible. Breathe here until the sensation is less intense, or for as long as you are comfortable.
Remove the block and lie on your back for a few breaths between sides, just noticing any differences in sensation between your sides.
Repeat on your other side.
2. Activate the External Arm Rotators

Lie prone with one arm bent in a cactus shape, elbow around 90 degrees, hand and wrist on a block or a folded blanket, depending on your ROM. The arm will be in external rotation here, adjust the height of the prop so your elbow is still on the floor and you feel a slight stretch. The other arm can support your forehead on the floor.
Just stay in a passive stretch here for a few deep breaths, as the muscles start to relax and lengthen.
Activate the core by pushing your legs and pubic bone into the floor, feel your belly lifting. Then start pushing your hand and wrist down on the block/blanket, activating the internal arm rotators, the muscles that were previously lengthening. Hold the pressure for 5-10 seconds before relaxing again. Repeat this 1-2 more times.
Again, activate your core, and now let the hand/wrist get lighter, and maybe even lift it away from the prop. This activates your external arm rotators. Hold for a few breaths before relaxing the arm. Repeat this 1-2 more times.
Repeat on the other arm.
3. MFR Levator
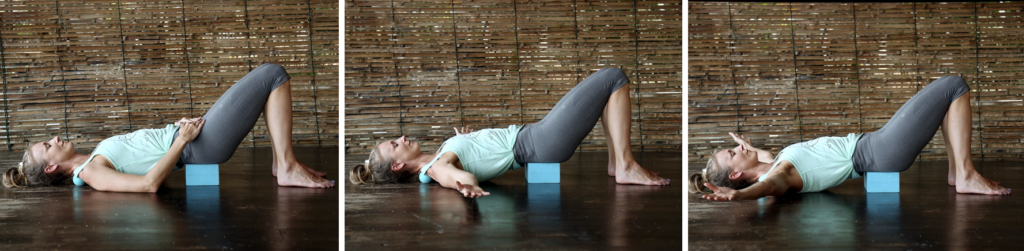
To release the levator scapulae, lie on your back with your legs bent, feet on the floor. You might want to keep a block near by. Place two tennis balls or therapy balls on the top medial corners of your scapulae. Take a few moments here to notice how this feels before moving on. Stop at any stage along the way if the sensation gets too intense.
When you are ready, use your legs to lift your pelvis off the floor, gradually pouring more weight over the balls. You can lift and lower a few times here, or just stay. If you want, you can place the block under your pelvis.
Make snow angel movements with your arms along the floor. You could also try crossing them in the air in front of you. Keep breathing, and picture how the shoulder blades are moving with your arms.
To finish, remove the block from under you and lower the pelvis back to the floor. Move the balls and stay on your back for a moment to rest.
4. Puppy Pose with Block – Externally Rotate Arms
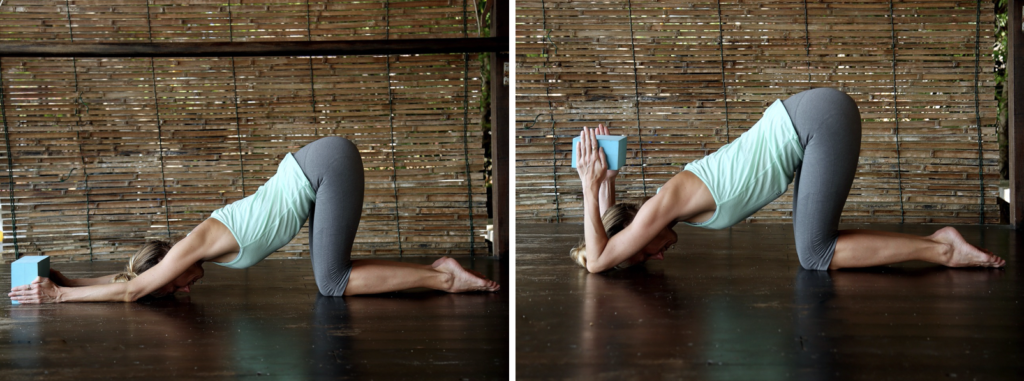
Give your internal arm rotators a stretch with this exercise.
Come into puppy pose, placing your hips over your knees, stretching your arms forward along the floor. Make sure your elbows are no more than shoulder-width apart and place a block on the floor between your hands. Adjust the width of the block according to the stretch you feel; a wider distance between your hands will produce more stretch.
To begin, just stay here for a couple of breaths and let your sternum sink towards the floor as you release any tension in your arms and shoulders.
When you are ready, start lifting the block off the floor and above your head. When you get there, again, breathe deeply and release any tension in the neck and shoulders. Stay for as long as you are comfortable.
To come out, slowly lower the block down to the floor and rest in child’s pose.