

Articles, In the Press, Rachel Land, Resources, Yoga Medicine® News
Yoga Blocks: Using Props to Advance Your Practice
Rachel Land for Yoga Journal shares 10 poses that utilize yoga blocks to deepen postures and advance your practice. Leave your ideas of props being for beginners at home, because this is a sequence for practiced yogis.
10 Ways to Use Blocks to Advance Your Yoga Practice
Before I became a yoga teacher, I didn’t use props; I didn’t “need” them to achieve the pose. It’s poetic justice that many of my students share my old attitude. They seem to disdain using blocks or straps, seeing them as an admission of weakness or inability to perform the “full pose.”
But here’s what I’ve learned: props are tools. You wouldn’t judge a builder as “bad” at his or her work because they used the right tool for the job, so why not use the appropriate prop in yoga practice? Props aren’t just for beginners; they can be used to develop and even deepen dimensions of asana practice. The humble yoga block, for example, gives us countless ways to vary our practice—highlighting sensations that help us experience a pose in a new way. Here are 10 of my favorites.
1. Supported Chest Opener

This potent chest opener, a variation of Fish Pose (Matsyasana), counters slumped posture by releasing tension in the pectoralis major and minor muscles in the chest. It opens up space for deeper breathing, making it a good position for expansive pranayama practices. It’s also a helpful start to a heart-opening practice, or a soothing finish to balance a practice involving a lot of chest and shoulder strength.
How the blocks help
The framework provided by the blocks allows us to relax completely, encouraging stubborn postural tension to dissolve from the pectoralis major and minor muscles. This allows for thoracic spine extension, giving us deeper range in heart-openers like Bow Pose (Dhanurasana), Lord of the Dance Pose (Natarajasana), and Camel Pose (Ustrasana).
Try it
You’ll need two yoga blocks; foam blocks may be more comfortable than wooden or cork blocks, but you can pad firmer blocks with a layer of yoga mat or blanket. Arrange the blocks in a rough T-shape. You’ll have one on its middle height, running up your spine from the base of your ribcage to the space between your shoulder blades; the other is on its highest setting parallel to the short end of your mat to hold the base of your skull. Take your time getting the set-up just right, so that you can relax completely.
Ensure you don’t feel any pressure in your lower back; lengthen your tail or bend your knees if you do. Once you are comfortable, allow your head to rest completely on the higher block, softening tension out of your neck. Find a comfortable position for your arms, either draped by your sides or opened out wide. Then notice how the lower block lifts and flares your ribcage while encouraging your upper arm bones to drape toward the floor to broaden your chest. Stay for a minute or two, inviting your breath to fill the space you’ve created.
2. Puppy Pose

Kneeling Heart-Opener Puppy Pose (Anahatasana) is a lovely way to open your chest, lengthen your latissimus dorsi and posterior deltoids, and (if you bend your elbows) stretch your triceps. Outside of yoga practice, we rarely take our arms overhead, meaning these muscles can become tight enough to restrict our range of motion.
How the blocks help
Adding blocks under your elbows makes the stretch even juicier, creating space for your chest to melt below the height of your arms. It’s also a helpful warm-up for poses with overhead arms, including Handstand (Adho Mukha Vrksasana) and Wheel Pose (Urdhva Dhanurasana). This variation can also be a satisfying counter to poses that require latissimus dorsi and tricep strength, like Upward Plank Pose (Purvottanasana).
Try it
You’ll need two blocks, and again soft foam blocks will feel more comfortable than hard wooden ones. Start on all fours with your blocks on their middle height, set up side by side parallel to the short edge of your mat. Place one elbow in the middle of each block, adjusting block position if required to ensure your upper arms are shoulder-width apart. Then walk your knees back until your chest melts down between your biceps and your hips are set just behind your knees.
Roll your upper arm bones away from your ears so that the sides of your neck soften, and allow your head to hang heavy. Then bend your elbows, bring your palms together, and draw your thumbs toward the back of your neck. Feel a stretch over your side ribs and down the backs of your upper arms. Lean into the stretch for at least five slow breaths before pressing down into your elbows to rise back up to all fours.
3. Yoga Bicycles

While not a traditional yoga practice, yoga bicycles appear in modern vinyasa classes as a quick pathway to a strong rectus abdominis, oblique abdominals, and hip flexors.
How the block helps
This variation adds strength work for the adductors on the inner thighs, and the pectoralis muscles on the chest. Keeping the block in place also boosts focus and coordination between upper and lower body. It’s a helpful warm-up for practices themed around balance, twists, or even backbends.
Try it
Lie on your back with your knees bent in toward your chest, cradling your head in one hand and holding a block in the other. Tuck one end of the block between your knees, then lift your head, drawing your bent elbows in to squeeze the other end of the block. Scoop your belly to press your low back onto the mat, using an exhalation to lift both your sacrum and your shoulder blades. Hold the block in place with your left knee and right elbow, slowly extending your right leg out to hover above the mat and twisting your torso to open your left elbow out wide.
Inhale here, and as you exhale, draw the extended leg and elbow back in to hug the block in place. Inhale as you extend the left leg out and twist your torso to the right, then exhale to hug back in to center. Swap smoothly from side to side with your breath, maintaining the inward pressure on the block to prevent it from falling. Aim for eight to 10 rounds each side before releasing the block and resting.
4. Sun Salutation (Surya Namaskar) A
Refresh this familiar sequence by highlighting the adductor muscles that run down the inner thighs. The adductors draw our thigh bones toward each other, and work with our deep core and gluteus medius muscles on the outer hip to create standing stability. However, they are sometimes neglected in favor of our better-known thigh muscles, the quadriceps and hamstrings.
How the block helps
Holding a block between your thighs as you flow through Sun Salutations will help you vividly feel the support and stability you can gain by accessing the adductors, especially in the challenging transitions.
Try it
Stand in Mountain Pose (Tadasana) and place a block on its narrowest setting between your thighs, with any excess block length behind your thighs rather than in front of them. Throughout the Sun Salutation, you will need to space your feet far enough apart that you can hug your thighs in to hold the block in place without feeling strain through your knees. Inhale to reach your arms overhead, and exhale to hinge into a Standing Forward Bend (Uttanasana), keeping the block snugly in place. Inhale to a Standing Half Forward Bend (Ardha Uttanasana), feeling a subtle movement of the block toward the back of your mat as your inner thighs spiral toward each other.
Exhale to plant your palms and float back to Chaturanga Dandasana, noticing how your grip on the block makes your legs feel stronger and lighter. Inhale into Upward-Facing Dog (Urdhva Mukha Svanasana) or Cobra (Bhujangasana), feeling the subtle spiral of the inner thighs away from the floor. Exhale to press up and back into Downward-Facing Dog. After your exhalation, bend your knees and float forward, using the inward and upward pull of your inner thighs to help you lift from the pelvis, rather than jumping heavily from the feet. Inhale to find a halfway lift, and exhale to fold forward. Inhale, driving down through your feet to hinge up to standing with arms overhead, and exhale to return to Tadasana.
Repeat two to three more Sun Salutations with the block in place, noticing poses or transitions where you tend to lose your awareness of the adductor muscles, then try one more without the block to see if you can keep the habit of engaging those key muscles without the prop in place.
5. Step Through
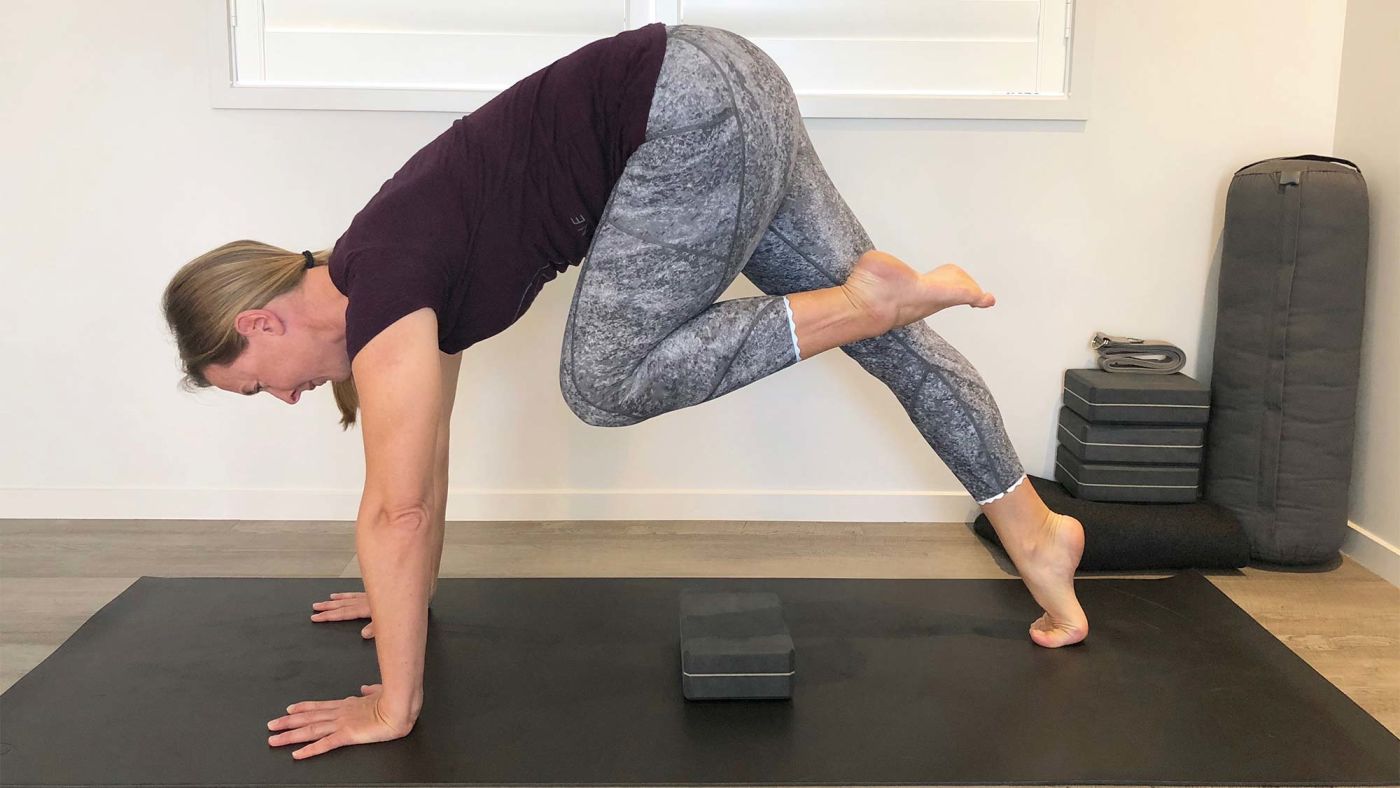
6. Stability Work
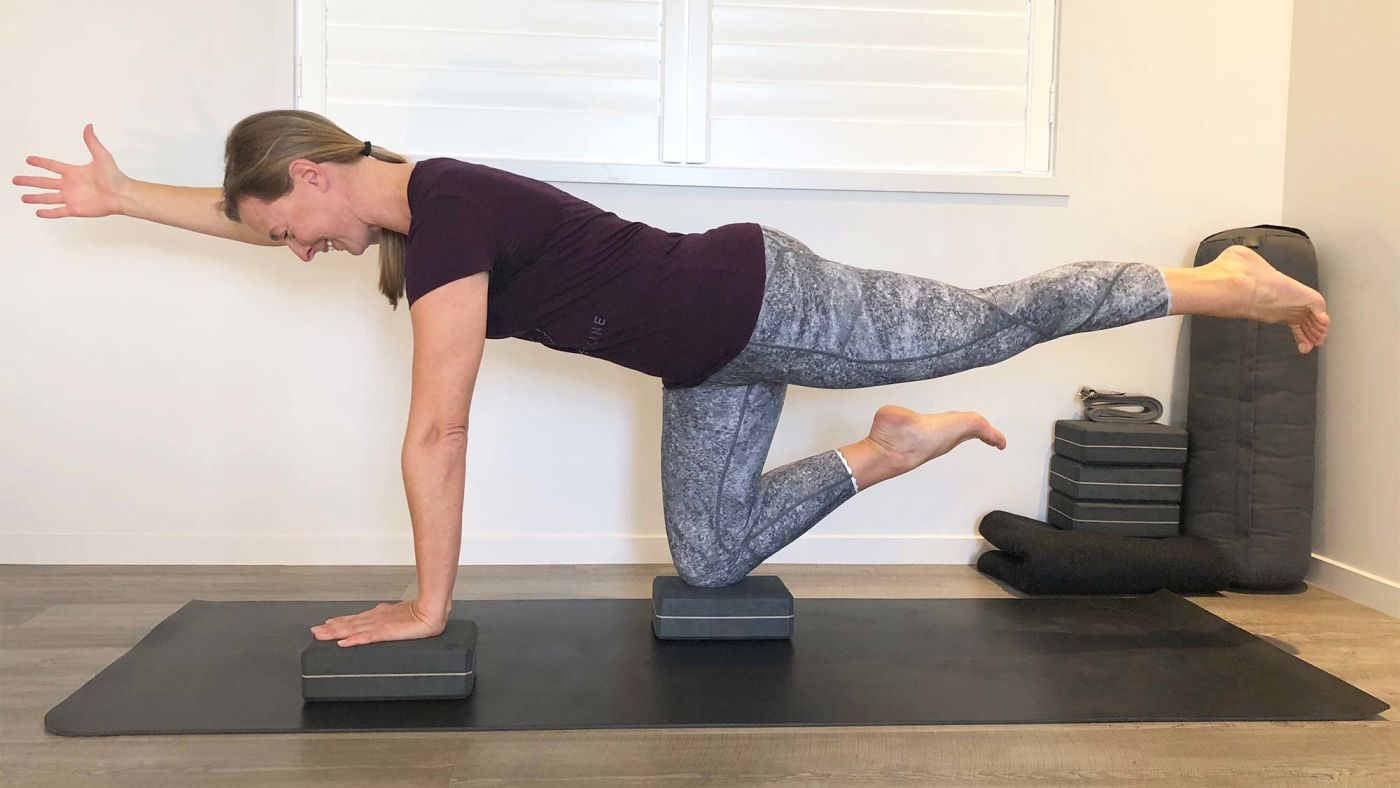
Balance work can be challenging but its huge payoffs—including improved physical stability, coordination, focus, and mental clarity—make it well worth the effort. We tend to do the same few balance poses in every class, but challenging our balance in new ways is crucial to create stability that translates off the mat and into our lives. One way to achieve this is to change our base; just like walking or running off-road is different to a treadmill, balancing on uneven or unsteady ground makes our stability muscles work harder, and improves our proprioception.
How the block helps
Changing the base we balance on by standing or kneeling on a block is a simple way to create a fresh challenge in a familiar pose. Just like walking or running off-road is different to a treadmill, balancing on uneven or unsteady ground makes our stability muscles work harder, and improves our proprioception.
Try it
Options here are limited only by your imagination, but you will need a soft foam block rather than a firm wooden or cork one to challenge your balance. Kneeling balance pose Bird Dog takes on a whole new feel when you destabilize your base by placing blocks under your support hand and knee and hovering your support foot. Practicing one-legged standing balance poses like Tree Pose (Vrksasana) or Half Moon Pose (Ardha Chandrasana) with your base foot on top of a block will open up new challenges in these familiar poses.
Or place a block under your front foot in Low Lunge, then notice the added challenge as you lift your torso into High Lunge, Crescent Variation. If your foot is longer than your block in either of these standing options, make sure you ground from mid-heel to ball of foot; your toes and the back of your heel can overhang if required. Once you find your balance, aim to stay for 5-10 slow and steady breaths, noticing how your body finds stability in a fresh way, before releasing to rest in preparation for your second side.
7. Upper Body Strength

Vinyasa yoga is reasonably good at building upper body strength, but many of us still struggle when our arms are overhead.
How a block helps
Squeezing a block between your hands when your arms are overhead is a simple way to build strength in the pectoralis muscles in your chest, the triceps and biceps in your upper arms, and serratus anterior over your side ribs. You can use this technique when your arms are directly overhead, as they are in Tadasana, Tree Pose, High Lunge, Crescent Variation, Warrior I or Warrior II; however, taking a diagonal line through the torso and arms, as you would in Extended Side Angle Pose, Extended Triangle Pose, or Half Moon Pose, also adds strength work for the oblique abdominals and quadratus lumborum in your side waist.
Try it
Set up for Warrior II with a block in hand, standing with your right foot forward and left foot back, and lining your feet up heel to arch. Track your bent right knee over your second or third toe, and gently draw your feet toward each other to create stability in your base. Sweep your arms out wide and overhead, squeezing the smallest edges of the block between your palms to awaken your chest muscles. Actively lengthen your arms toward the ceiling, firming your triceps and biceps in around the bone. Feel your shoulder blades wrap over your side ribs, allowing the outer borders of the shoulder blades to lift, but softening their inner borders toward the back of your waist so that the sides of your neck can soften.
Slowly tilt your torso toward your bent right knee, spiraling your right ribs forward and your left ribs back to come into a variation of Extended Side Angle Pose. Feel your left side waist working strongly to keep you reaching through your fingertips, rather than bending toward your right knee. Stay here for three to five slow and steady breaths, relaxing your neck and jaw. If you’d like more of a challenge, either straighten your right leg to move into Extended Triangle Pose, or shift your weight into your right foot and float your left leg into Half Moon Pose. When you are finished with your right side, move back to center and release your arms down to rest before moving on to the left side.
8. Handstand Hops

If you’re anything like me, the idea of practicing Handstand in the middle of the room fills you with fear. For those of us who are more flexible, it’s easy to collapse into a backbend and overbalance.
How the block helps
The simple addition of a block can make even this challenging pose feel more achievable. Using the block to pin one leg to your chest gives you a counterweight to the lifting leg, and forces you to engage the core muscles that stop you from falling over into a backbend.
Try it
Begin in Downward-Facing Dog with a block close to hand. Step your left foot halfway up your mat, then pin the block between your left thigh and left ribs. Shift your shoulders forward to stack above your wrists, slightly spread your fingers, and grip with your knuckles and fingertips. Rise onto the ball off your left foot, using your abdominals and hip flexors to squeeze the block in place. Lift your right leg out behind you into Three-Legged Dog, gaze between your hands, and lean forward into your fingertips.
Without dropping the block, take a Handstand Hop, aiming to stack your pelvis above your shoulders. Reach your right foot toward the ceiling and hug your left heel toward your buttock. If you feel as if you are about to overbalance onto your back, just release your left foot back down to the floor and the weight of your leg will draw you back to Three-Legged Dog. Try five to eight light hops, then release down to rest before trying the second side. If you are game, try once more on each leg to see if you can re-create the same core engagement without the prop.
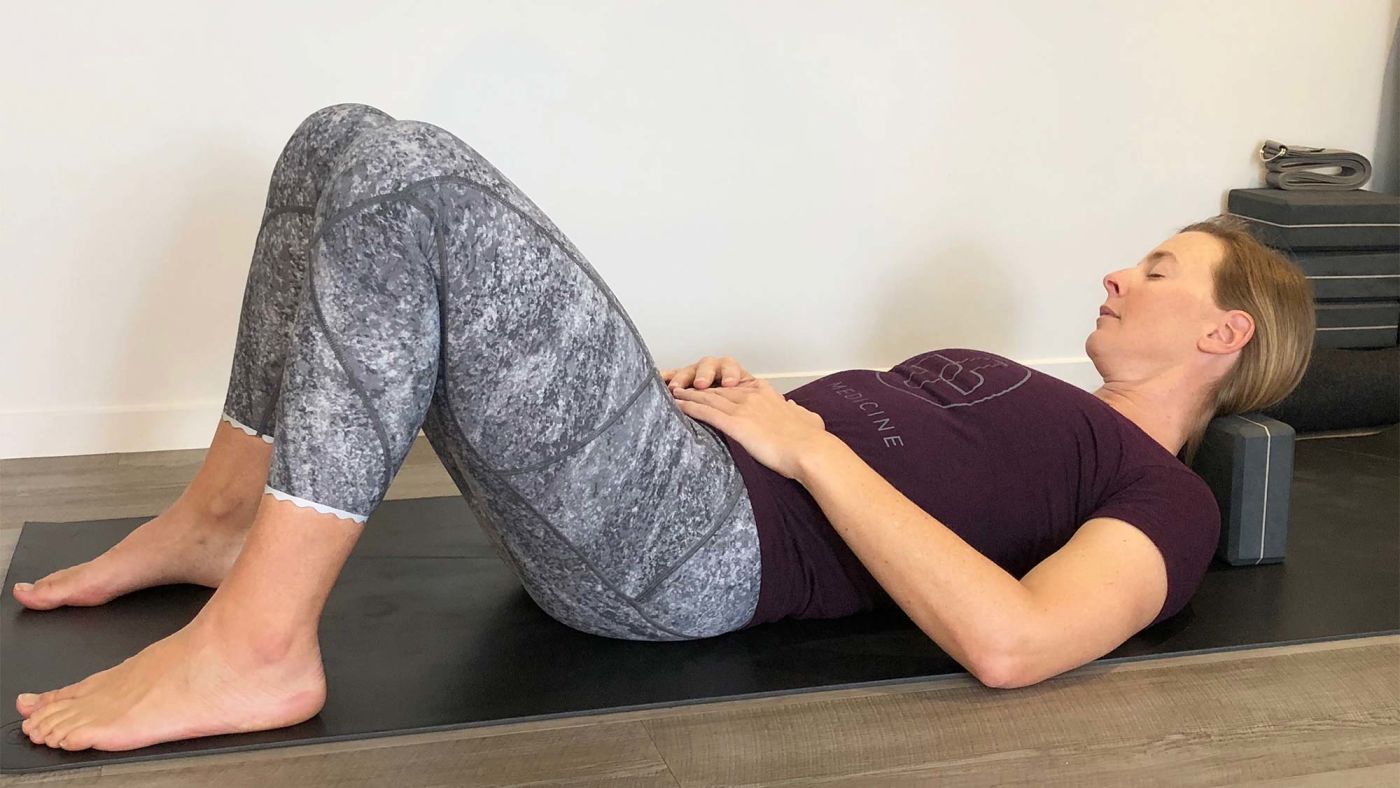
9. Psoas Release

This subtle stretch for our primary hip flexor, the psoas, is one of my favorite counterposes to a day of sitting, or a yoga practice heavy on forward bends. It can also be helpful warm-up for deeper backbends like Camel, Lord of the Dance, and Wheel Pose. Because the psoas originates on the spine around the bottom of the ribcage, it’s crucial that you find a position where your lower back can relax, rather than arching your back or looking for a strong stretch over the front of your hips.
How the block helps
When releasing psoas tension, we often think of strong stretches like a Low Lunge, but using the block to prop us in more gentle hip extension allows us to stay for a longer period of time, gradually relaxing deep tension out of the psoas.
Try it
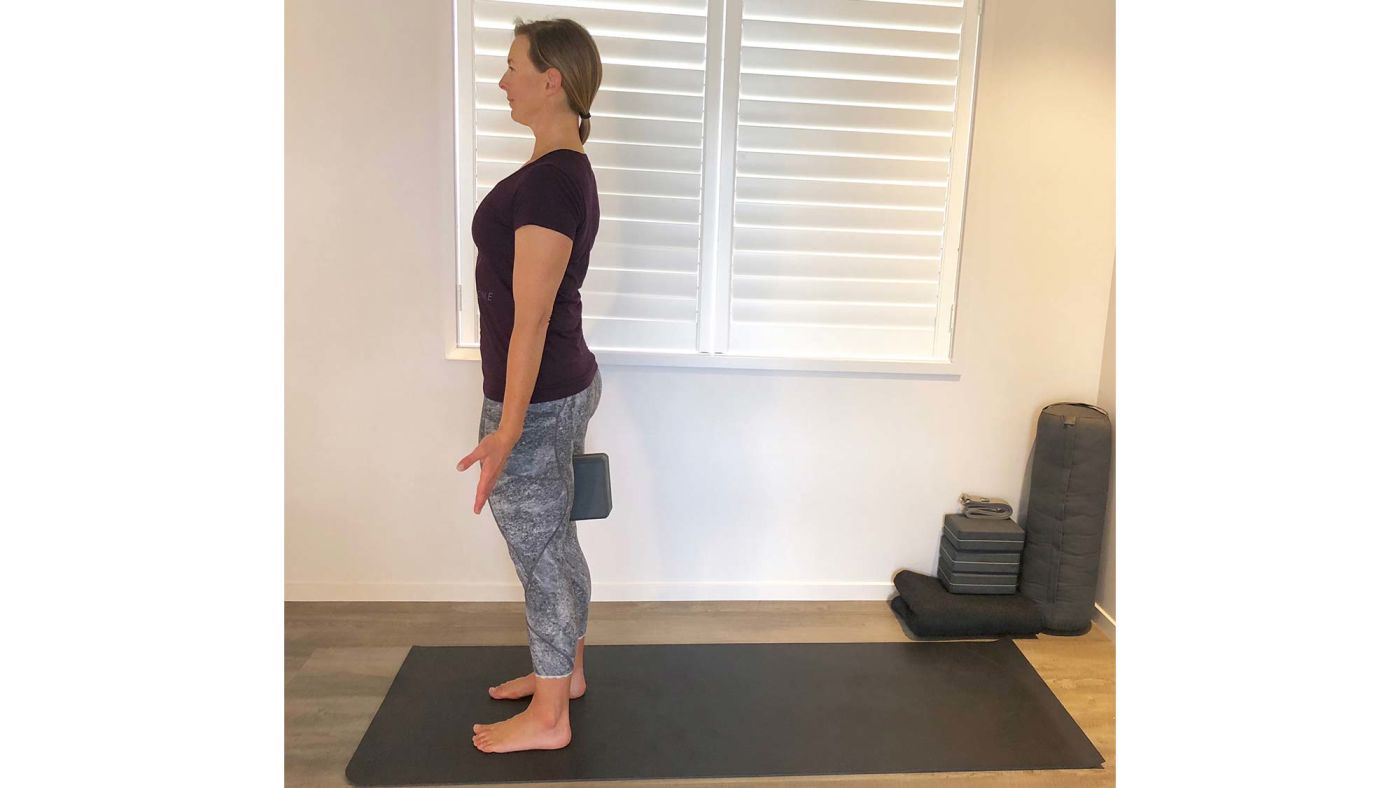
Start as if coming into Bridge Pose: lie on your back with your knees bent, feet on the floor, and a block in one hand. Press into your feet to lift your hips, then position the block under your sacrum, set on its lowest height, parallel to the short edge of your mat. Make sure that block is closer to your buttocks than your low back, so that your spine can drape rather than arching. If you feel pressure in your low back, move the block closer to your buttocks. Then draw your bent left knee into your chest or toward your left shoulder and take a loose grip with your hands.
Use the position of your left knee to subtly tilt your pelvis posteriorly (toward the back of your waist), broadening your low back and creating more length over the front of your right hip. You may not feel a strong stretch, but you should be aware of your right hip flexor lengthening or softening. Stay for eight to 10 slow deep breaths, relaxing as much as you can, before releasing your left knee to swap sides. When you have completed both sides, exit the pose as you came into it. Windshield wipe your bent knees side to side, or hug your knees into your chest, then take a few breaths in Savasana to see if you can feel the length you’ve created over the fronts of your hips.
10. Neck Release